


The brand Stentor is renowned for its quality, consistency, and reliability. Stentor violins, violas, cellos, and double basses accompany students from their very first study instrument to professional-level musicians. Teachers and educators worldwide recognize the value and quality that the Stentor brand delivers.
Violin and Viola Care Guide
This brief guide offers useful information about your instrument and how to maintain it properly, from storage to changing strings and tuning.
Storage and Humidity
Avoid leaving your instrument in places that are excessively hot or cold—for example, inside your car under the sun or overnight, or near a radiator. Sudden temperature changes can cause issues such as cracks or breaks. The wood in your instrument adjusts to the humidity of the surrounding air. It’s good practice to keep your instrument inside its case when not in use.
The following diagram shows some of the different parts of your instrument:
| 1. | Fingerboard | 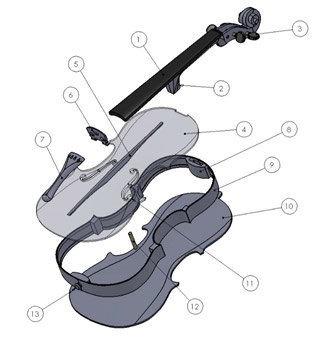 |
|
| 2. | Heel | ||
| 3. | Pegs | ||
| 4. | Soundboard | ||
| 5. | Bass bar | ||
| 6. | Bridge | ||
| 7. | Tailpiece | ||
| 8. | Upper block | ||
| 9. | Rib | ||
| 10. | Back | ||
| 11. | F-holes | ||
| 12. | Sound post | ||
| 13. | Button |
Cleaning
Keeping your violin or viola clean will help preserve it in good condition. Each time you play your instrument, white dust from the bow rosin can accumulate on the top plate of your instrument. This dust can eventually harden and stick to the top plate. It is advisable to clean this dust with a soft cloth after playing. Generally, it is not recommended to use liquids for cleaning your instrument, but there are some dedicated cleaning solutions available on the market.
Tightening Your Bow
Tighten and loosen your bow by turning the screw at its end (see figure 2 in the diagram below). As you tighten the screw, you will notice the stick (fig. 1) bending and the hair (fig. 3) gaining tension. Be careful not to overtighten the bow; it is recommended to adjust it so there is about a 10 mm gap between the hair and the center of the stick’s curve.
Over time, the bow hair will wear out and will need to be replaced by a qualified technician. If you have a P&H bow, you can easily replace the hair using their patented system.
Keep your bow inside its case when not in use to prevent accidental damage. The hair should also be loosened when the bow is not in use, so it remains untensioned but not so loose that it becomes floppy.
| 1. | Stick | 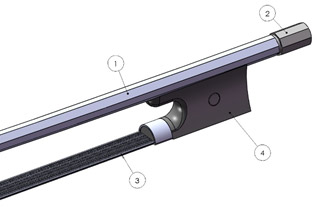 |
|
| 2. | Buttón | ||
| 3. | Hair | ||
| 4. | Frog |
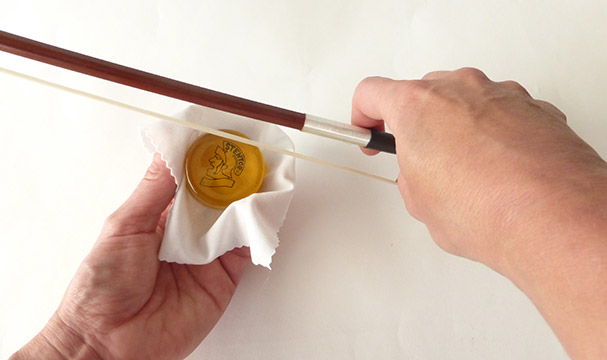
Applying Rosin to Your Bow
It is necessary to apply rosin to your bow before playing. Avoid touching the rosin with your fingers to prevent greasing and dirt buildup. Tighten your bow and carefully slide the rosin along the flat surface of the bow hair, allowing the powder to adhere to the hairs. The rosin powder increases friction when contacting the strings of your instrument. Generally, rosin comes in light and dark shades, with the light usually being softer and the dark harder. Keep the rosin in a cool environment, as it tends to melt at high temperatures. It is recommended to clean the rosin dust off the bow stick with a soft cloth after application.
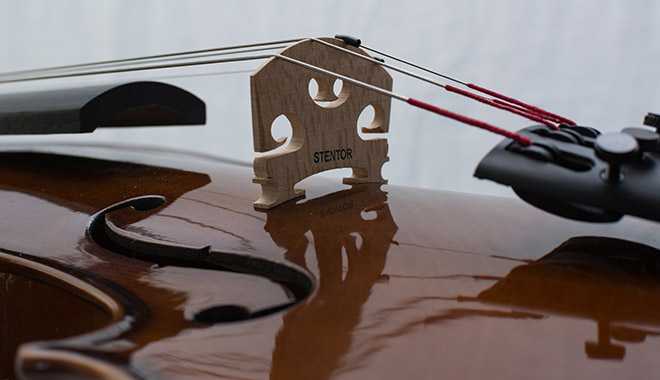
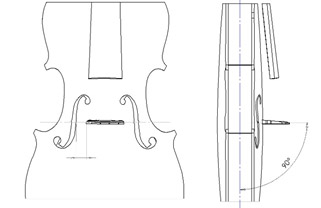
Check the Bridge Position
The diagram below shows the bridge in the correct position from both a side and top view. In the side view, imagine a central line through the horizontal plane of the instrument; the front face of the bridge should form a perpendicular (90º) angle to this imaginary line (see the diagram below). In the top view, the bridge should be positioned equidistant from both f-holes. When you tighten the strings, the bridge will tend to lean forward. You can return the bridge to its correct position by applying gentle pressure with your thumbs and index fingers. Make sure the feet of the bridge sit properly, forming a flat plane with the top of your instrument. Be careful not to overtighten the strings, especially the E string, as they may break.
Tuning Your Violin and Changing the Strings
The tuning of your violin will also need to be adjusted regularly. You can tighten the strings using the pegs located in the scroll of your instrument, or with the fine tuners on the tailpiece. The standard violin tuning is G, D, A, E — with G being the thickest string and E the thinnest. The viola uses a tuning of C, G, D, A — with C as the thickest string and A as the thinnest.
To tune your instrument, you will need a tuner. There are various options available on the market, including smartphone apps. Adjust the tension of each string until it reaches the correct pitch.
Occasionally, you will need to change the strings. To do so, you can follow the steps shown below:
Remove the old strings:
|
1. Remove and replace your old strings one at a time. Do not remove or loosen them all at once, as this could cause the bridge to shift or even fall. |
|
|
2. Change the G string first. Turn the peg towards you to loosen the string, then pull the string to unwind it from the peg. |
|
|
3. Unhook the ball end from the tailpiece and remove the string. |
Putting on new strings:
|
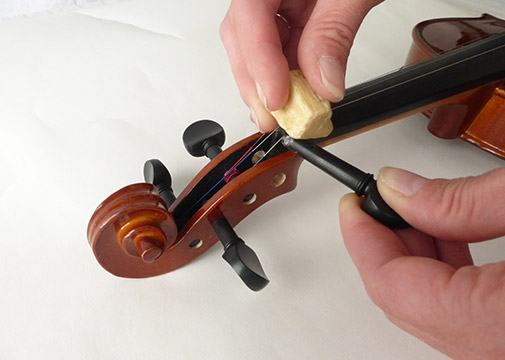
1. With the G string removed, pull the peg out of the pegbox hole. Rub the peg with a small bar of soap right where it contacts the pegbox hole; this will help the peg turn smoothly. |
|
|
2. Rub the part of the string that will be in contact with the nut and the bridge with a pencil. |
|
|
3. Insert the ball end of the new string into the tailpiece of your violin. |
|
|
4. With the peg lubricated and already placed inside its hole, pass the new string through the hole and turn the peg towards you (counterclockwise). See step 1 in the "Changing Strings: Step by Step" diagram shown below. |
|
|
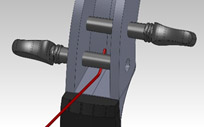
5. Try to overlap the end of the string on the second turn of the peg, guiding the string toward the outer wall of the pegbox. On the next turn, guide the string toward the inner wall of the pegbox; this will pull the string inward, trapping the end between the winding and preventing the string from slipping while tuning. Tighten the string to keep the bridge in place and tune it to the correct pitch. See steps 2, 3, and 4 in the "Changing Strings: Step by Step" diagram. |
|
|
6. After the G string, move on to the E string and repeat the process. By changing the two outer strings first, you will maintain even pressure on the bridge, preventing it from shifting or sliding. Then, repeat the process for the D and A strings. |
Changing the Strings: Step by Step
|
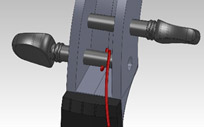
Step 1 Insert the end of the string through the hole in the peg until a small part of the string protrudes on the other side. |
 |
|
|
|
||
 |
|
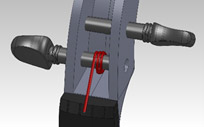
Step 2 Turn the peg away from you, using your finger to guide the string toward the outer wall of the pegbox. |
|
|
|
|
|
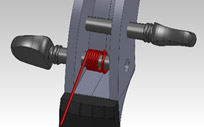
Step 3 As you turn the peg, guide the string toward the inner wall of the pegbox. Overlap the first loop of the string with the protruding end trapped between the two loops. |
 |
|
|
|
||
 |
|
Continue turning the peg and guiding the coil of the string toward the inner wall of the pegbox. Repeat the process for the other three strings. |